Saturday, July 18, 2009

Anniversary Gift Set

My husband and I got a last minute invitation to a surprise anniversary party. Since my husband took the call, I didn't get any details. He said we were to bring Hot Dogs and Buns, he wasn't sure if we were to bring a dessert too or not, he just said some of the ladies were also bringing dessert. Of course he doesn't ask any questions.

This is a party given to a pastor and his wife by their church and it's going to be a weiner roast. That's all I know. Sometimes when they have parties like this, they will tell you - no gift, just a card - sometimes they do have gifts. Since I wanted to be safe instead of sorry and totally embarrassed, I decided I needed to have a gift.

Now we got the phone call yesterday evening about 5:30. My daughters had been here for lunch that day, my house was a mess, and my grandson decided he didn't want to go home and take a nap, he wanted to stay here and take a nap with granny. So I didn't even get to start on this until about 9:00 last night because I had to put my stamp room back in order (long story short I had no power to any of my electrical outlets in just my stamp room and I had to take things out of cabinets so we could move them to check outlets).

So anyway here is what I came up with. I saw this box made on a Stampin' Up video. The box measures about 6.25 x 6.25 and is about 2.75 deep. I made the box with the retired paper Parisian Breeze and Chocolate Chip cardstock. I also used the border punch on mine which I think really adds to it.

I made the tag on top from the stamp set Baroque Motifs. I used the retired Baja Breeze and Not Quite Navy. The ribbon is not Stampin' Up, they don't sell this kind of ribbon anymore.
I hit the ribbon with my heat gun, which is a fun technique to do, and it just kind of curls up your ribbon. You have to be real careful not to burn all the way through the ribbon though.

And lastly, I made a card and matching envelope using the same colors: Baja Breeze, Not Quite Navy, and Chocolate Chip. The only thing I don't like is that I used Very Vanilla Cardstock to stamp on, and I only had Whisper White envelopes on hand, so they don't match. Hopefully that won't stand out to much.


When it came time to stamp the inside of the card I realized that I didn't have any anniversary sentiments other than "Happy Anniversary" and the one shown in the card. I'm definitely going to have to buy me some.


And for the gift itself, I made a tile with my Cricut and vinyl. I used the Chocolate Chip Vinyl sold by Stampin' Up and the tile can be bought at any place like Menard's or Lowe's. For some reason, I can't upload the tile on this post, so I will post it separately.

Thanks for looking,

Kim

Friday, July 17, 2009

Masculine Cards - Don't have to be hard


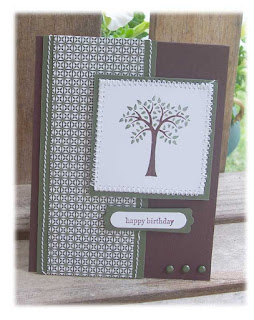
This card would make a great masculine card. And if you left off the stitching, you would still have a very nice and a very simple card.

When I first saw the stamp set "Forest Friends" I thought it would make a cute kids set, but it really is very versatile.
Check out This Post to see another card made with this set.

I used Chocolate Chip and Always Artichoke markers and paper, the new modern label punch, word window punch. and Designer Series Paper. I also added some Always artichoke brads in the corner.

Thanks for looking,
Kim

Thursday, July 16, 2009

Aren't These The Cutest Things...

No, not my granson although he is pretty cute too. I was talking about the Keychain Scrapbooks.


Now those that know me, know that I am not a scrapper for a couple of reasons. One I don't usually take very good pictures and two the idea of doing a big 12x12 scrapbook is overwhelming. I like projects that I can finish in an evening.


But I saw these on another blog (I will try and find it again so I can give proper credit) and decided to make one. They are so quick and easy to make. It took longer to figure out which pictures to use and how to use my printer dock that I hadn't used in ages, then it did to make the actual scrapbook.


When I told my daughter Jess (who likes to scrapbook), that I made her and her sister a scrapbook, she was all excited and wanted to know how long I had been working on them. Then I showed her the scrapbook and she just laughed, although she did think they were really cute. This is Jess' son Ryan, who is holding his Aunt Brandy's scrapbook. It has pictures of his cousin Hydi in it. The finished size of these scrapbooks are 2"x2".


Thanks for looking,

Kim

Wednesday, July 15, 2009

K.I.S.S. Card


Have you heard the term "KISS Card". It means "keep it simple stamper". This is certainly a KISS Card.

This is one of the cards that I made at the cabin a couple of weeks ago. Remember, I had a limited amount of supplies with me, so I had to keep it simple.

This card uses the stamp set "Flight of the Butterfly" and the new Modern Label punch. The colors are Pretty in Pink and Rich Razzleberry ink, Old Olive and Rich Razzleberry Paper.

Other than a lot of piercing, this was definitely a simple card.

Thanks for looking,
Kim

Poppin Pastels


The very first technique that I learned at my very first workshop was the "Poppin Pastels". I had no intention of buying the chalks until I saw this technique. Then of course I had to add a Versamark pad also.

Next week I am doing a workshop for a group of ladies who are new to the world of stamping and I've been trying to figure out some fun techniques to demonstrate. I wanted something that would "Wow" them, yet at the same time was something a beginner stamper could do. While surfing through some of my favorite blogs, I saw GinaK doing this technique on Stamp TV. And I thought this might do it. It certainly impressed me the first time.

While I don't think we will be making this card, I do think I will demonstrate something similar to this one. This card was made with the stamp set Bloomin Beautiful. I used Whisper White, Pretty in Pink, and Chocolate Chip cardstock. After adding a layer of Designer Series Paper to the first layer, I ran it all through the Big Shot using texture plates, then did a little sanding on the DSP.

To give it a little dimension, I stamped the main image twice, then after applying the chalks I cut them out. The first image I used the whole thing, the second image I just cut out a couple of the individual flowers then popped them all up with Stampin' Dimensionals. What do you think, will this be a good card to demonstrate?

Thanks for looking,
Kim

Tuesday, July 14, 2009

Another Janome Special...


I have really been enjoying my new Janome Sew Mini the last few days. I have been sewing on almost all my cards.

Here is a card that I made for a wonderful lady named Marge. Marge is my brother's mother-in-law and one of the best piano players ever. She came to our church Sunday and played for us and it was very uplifting. For those who don't know, Steve, my husband, pastor's a small country church called Freedom Baptist Church. Our pianist is an elderly lady who hasn't been able to come for well over a year due to health reasons. So we have been using recorded music in our services. So it was a real treat to have Marge come and play for us.
 

Marge can play anything too. She can also play by ear. My daughter Jessi had her play for her wedding and she wanted me to walk down the aisle to something of Elvis' since he is my all time favorite singer. Marge didn't have any sheet music for Elvis' songs so she got a CD somewhere and listened to it and needless to say I walked the aisle to the music "For I Can't Help Falling In Love With You".

Thanks for looking,
Kim

You're on My Mind...


Here is another card that I have sewn on with my new Janome Sew Mini. If you are looking for an easy to use, inexpensive, real sewing machine, this is the one for you.
The color looks a little washed out, but I used So Saffron and Pumpkin Pie paper, the Daisy die and the Stamin' Up Little Leaf die. The sentiment is from the stamp set Upsy Daisy and is stamped with Chocolate Chip ink.
Thanks for looking,
Kim

Monday, July 13, 2009

My "Latest and Greatest" Tool

Ok, here is my new "latest and greatest" tool. It's the Janome Sew-Mini.


Now those who know me well know that I have absolutely no sewing abilities. As a matter of fact, I almost didn't pass 7th grade Home Ec because I had problems making my apron. Mrs. Charles, our teacher, insisted that everyone had to make an apron to pass the class and to be able to start the "cooking" part of the class. This was a class that every boy and girl had to take, it was not an option. And even the boys did better on their aprons than I did. If it wasn't for my friend Debbie who finished my apron when the teacher wasn't looking, I would still be sitting in that class today.

Because of this ordeal in 7th grade, I have never tried sewing on cards before, although I really think it adds to them. Now if you also know me, you know when it comes to card making, I like to try every technique out there. So I had been considering for some time purchasing a sewing machine. I had been looking at the Pixie Machines by Singer that are sold at Wal-mart. I just about made up my mind to buy one when I saw the Janome featured on Stamp TV. After doing a little more research I found that most people chose the Janome over the Pixie Singer. And several ladies who bought the Pixie had trouble with them and returned them.


Now for those of you who can sew, you are probably looking at my little machine and laughing, but I really like it. I watched the videos on Stamp TV to learn how to thread the machine and make a bobbin. It took me a while to catch on the first time, I had a couple of issues, but the second time I made the bobbin and rethreaded the machine it was a piece of cake. My sewing skill are lacking a little as you can tell from my first card here, but I hope to get better with practice. So there you have it, my new tool and my first card made with my new tool. What do you think?

Thanks for looking,

Kim

Sunday, July 12, 2009

The More the Merrier!


Remember, we are doing simple cards here.
This card is again made with The More the Merrier Hostess Set and the new Teeny Tiny Wishes set.
I used ballet blue for the card base, I don't think I have ever used this paper before. The image is colored in with various Stampin' Up markers and I hope you can see the little bit of dazzling diamonds glitter that I added on the hat and on the snow.
I also used my favorite tool, which I told you before were punches. I own most of the punches that Stampin' Up has and a few they don't have. On this card I used the brand new Modern Label Punch along with my well used Word Window Punch.
I haven't forgot about sharing with you my "latest and greatest" purchase. It will be coming soon!
Thanks for looking,
Kim

Saturday, July 11, 2009

Another Card From the Cabin

Here is another card that I made while at the cabin.

Again it is a pretty basic card. The image is from the new Level 3 Hostess Stamp Set "The More the Merrier".

I used Chocolate Chip and Always Artichoke paper, Close to Cocoa and Creamy Caramel Markers to color the acorn and of course my favorite tools and favorite accessories - Punches and Ribbon. For some reason I don't feel like a card is complete without ribbon on it. It is kind of hard to tell from the picture, but I also used Crystal Effects over the acorn. That seems to be another product that I have started using a lot lately.

Thanks for looking,
Kim

Friday, July 10, 2009

Finally a New Card...

Ok, I have a new look to my blog. Looks nice and summery doesn't it? Now I just need some cards to post, right?

I do have quite a few cards to post, but today I am starting with a very simple card. Remember I told you we spent last weekend at the cabin? Well I spent all Friday morning sitting on the front porch of our cabin just making cards and looking at the new catalog. Well I did get about 5 simple cards made.
I was making very simple cards for two reasons, one I was limited to the amount of stuff I had to work with. We have plenty of room at the cabin, so I guess I could of took as much stuff as I wanted, but I would have to pack it over and pack it all back, so I limited myself to filling my tool chest. The second reason I was making simple cards is because I'm doing a workshop later this month with some new stampers and I wanted some samples to show them without overwhelming them.

So, here is one of the simple cards that I made.
I used the new In-colors Dusty Durango and Crushed Curry papers and inks along with Old Olive and Chocolate Chip ink. I also used the scallop punch and added the dots with a white gel pen. Pretty basic stuff right? Oh yeah, and I added some Old Olive brads at the bottom. I love brads!
Anyway, that is my card for today. Check back again this week as I have several posts ready to go and I also want to share with you my "lastest and greatest" purchase (as my husband calls it).

Thanks for looking,
Kim

Sunday, July 5, 2009

My New Look...

While surfing the net tonight, catching up on my favorite blogs, I ran across a blog that offers free blog layouts. So here is the one that I picked for now. I may change it as the site offered several to choose from.

Anyway, this new layout comes with three columns instead of two which is what I had. So if the posts seem a little out of whack, this is probably why. I also need to adjust my sidebars somemore, but it is after midnight now and I have to get up for church tomorrow so I am going to bed.

If you are interested in the site that I got this layout from, there is a link at the top of my blog. It was very easy to follow the instructions to install this.

Goodnight and thanks for looking.

Kim

Thursday, July 2, 2009

CHECK OUT THE SIDEBAR!

Hi everyone,


Just a quick post to let you know about some of the specials going on at Stampin' Up.


First of all the new catalog is out and if you would like a copy, just shoot me an email. You can also see it online by clicking on the picture of the catalog on the left hand side of this blog. Scroll down a little further and you can view the new Definitely Decorative catalog that is also available.

Stampin' Up is also running a great special this month. Each Monday they will post the Deal of the Week, this item will be discounted for one week. This week's deal is the scallop punch for 30% off. Keep checking back as I will update this each week.


Also, if you have considered becoming a demonstrator, whether it is to get the discount or to start your own business, now is a good time to do so. Stampin' Up is offering a "mini starter kit" for just $85. Click on the button to find all the details.

As I posted previously, I am trying to catch up on some things that I got behind on due to the craft show I participated in, so I haven't posted any projects lately. But I am going camping this weekend and taking some "stuff" with me. So hopefully, I will have some cards to post next week. And again, don't forget to check back to find out about next week's special. We will get a new special each Monday for the month of July.

Have a safe and happy 4th of July.

Kim

LinkWithin

Related Posts Plugin for WordPress, Blogger...